
The default limits for the SharePoint Online versioning are somewhat complex. First there is not necessarily just one setting to set your limit. You have the multiple options to define limits in your SharePoint environment, e.g. at SharePoint Tenant level, at a SharePoint site or even on a single SharePoint library.
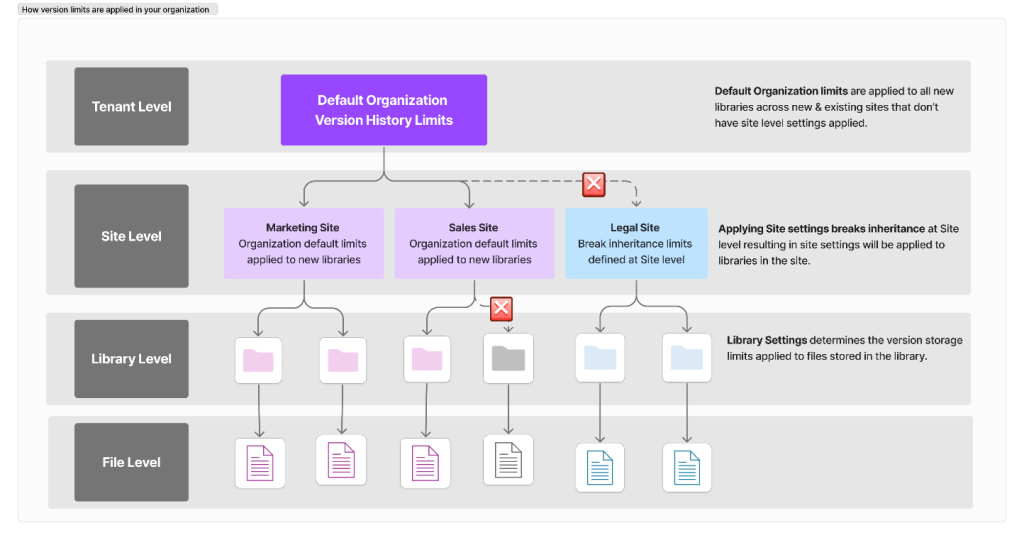
Version history limits are applied in the following ways:
- Default organization limits: Organization default settings are applied to all new libraries created on sites that don’t have site level settings configured.
- Site limits: It is possible to break inheritance for a site by configuring version history limits for the site. When version limits are configured on a site, the settings are applied to all new libraries created on the site.
- Library limits: It is possible to break inheritance at library level to define version limits for files stored in the library.
The default SharePoint Online storage capacity is 1 TB plus additional 10 GB per Microsoft 365 License. For example: If you have 4000 Microsoft 365 E3 Licenses, you will have 41 TB of SharePoint Online Storage.
But why should you care about the version history? Sadly because dependent on your content in SharePoint Online the versioning history can take a huge amount of space in your Microsoft 365 tenant. Microsoft is aware of that problem and luckily announced a way to limit the number or age of versions and auto delete them.
We are introducing new version controls that help tenant and site admins or document library owners reduce the storage footprint driven by low value file versions. Today, document library owners can set count-based version limits at the individual document library level. With the upcoming changes, tenant and site admins or document library owners will have two version history settings: 1) Automatic mode that intelligently expires new and existing version based on their age and restore probability, and 2) Manual mode that will allow admins to set time-based version expiration and count limits on new and existing versions. These controls enable admins to set an appropriate level of recoverability and auditability for their organization balanced with storage usage considerations. Version history limits and management also apply to OneDrive for Business.
Feature ID: 145802
Microsoft 365 Roadmap | Microsoft 365
Added to roadmap: 6/29/2023
Last modified: 4/3/2024
Product(s): OneDrive, SharePoint
Cloud instance(s): Worldwide (Standard Multi-Tenant)
Platform(s): Web
Release phase(s): Preview, General Availability
To administrate SharePoint Online via command line you could use the PnP-PowerShell-Modules, although these only work on windows os, but also support on premise SharePoint Server. Because I primarily work with macOS as my operating system, I will instead use the newer cross-platform compatible PowerShell 7.2-Modules. So keep that in mind if you copy my later commands and be sure to use at least module release 2.3.0.
Install the PowerShell Module
You can install the PowerShell-Module simply by this single line. If you are not using windows but e.g. macos, you first have to install Powershell.
Install-Module "PnP.PowerShell" -Scope CurrentUserAfter the installation you need to connect to your SharePoint tenant with at least the SharePoint Administrator Role and enable to the preview feature.
Enable the preview feature
Connect-PnPOnline -Url "https://timoewiak.sharepoint.com" -Interactive
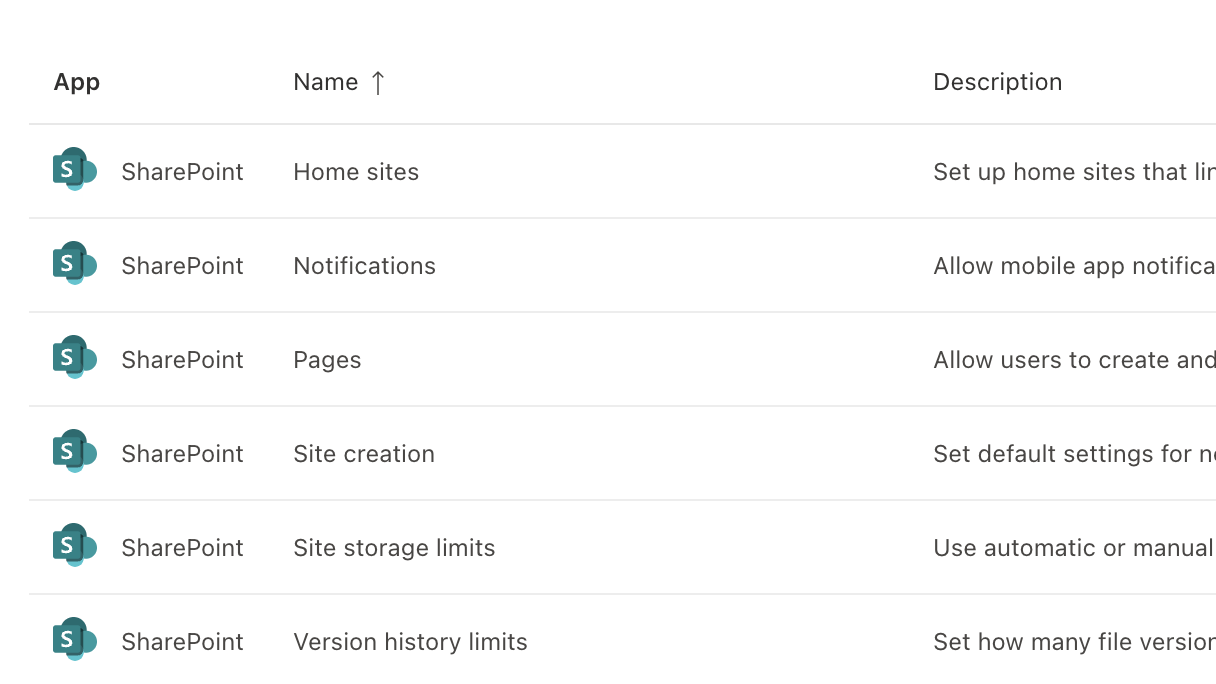
Set-PnPTenant -EnableVersionExpirationSetting $trueAfter executing the command you will see a new entry in the SharePoint Online settings menu called “Version history limits”. There you can configure what kind of logic you want to apply. With the automatic setting microsoft will provide settings based on their recommendations in relation to activity and age of files. With the manual setting you can override that logic and define the exact values for the maximum number of major and minor versions and / or the maximum age. The default value for SharePoint Online is 500 major versions without any time limit.

| Select this option: | If you want to: | Benefits |
|---|---|---|
| Automatic(Recommended) | Automatically apply optimal storage of versions based on its age and restore probability. With this setting, users have access to most of the recently created versions. As versions age, fewer older versions are stored. No other input is required from admins. | Storage Use: Automatic setting is the recommended setting that offers users’ access to high value versions while optimizing storage consumption from versions. Versions Restore Options: This setting ensures version history at key timestamps is always available for restore even on file with no new file edits. |
| Manual with Major Version Limit and Expiration Period set | Store versions only until the configured expiration period and within the configured major versions count limits. With this setting, users have access to all versions within the count and expiration period. | Storage Use: This setting is the best option for ensuring the lowest quota impact from version storage as it trims versions that are older than the configured expiration. Versions Restore Options: When an expiration limit is set, it’s possible for files with no recent edits to have all their versions trimmed if the updated version policy dictates that. For example, if a file doesn’t get edited in six months and a six-month version expiration policy is in place, then all that file’s versions are deleted. |
| Manual with Major Version Limits and No Time set | Always store the configured count of versions regardless of version age. Users have access to all the versions within the count limit. | Storage Use: This setting can lead to high quota consumption from versions if you have a high ratio of heavily edited files or if you set the limits too high. Version Restore Options: This setting is the best option for storing a set number of versions offering you predictable version storage behavior. |
Next let’s check the different options on the command line. You can set the settings on tenant, site or library level. We will continue first with how to check the current settings and after that we move over on how we set the limit an every level.
Check the settings on SharePoint tenant level
To get the current settings of our SharePoint tenant we type in the following command:
Connect-PnPOnline -Url "https://timoewiak.sharepoint.com" -Interactive

Get-PnPTenant | fl EnableAutoExpirationVersionTrim, ExpireVersionsAfterDays, MajorVersionLimit

EnableAutoExpirationVersionTrim : False
ExpireVersionsAfterDays         : 0
MajorVersionLimit               : 500
Check the settings on SharePoint site level
With the following command we get the current value for the current SharePoint Online site. If the version policy is not set on that level, the settings of the tenant will be used.
Connect-PnPOnline -Url "https://timoewiak.sharepoint.com/sites/TimosVersionHistory" -Interactive

Get-PnPSiteVersionPolicy
Url                    : https://timoewiak.sharepoint.com/sites/TimosVersionHistory
DefaultTrimMode        :
DefaultExpireAfterDays :
MajorVersionLimit      :
Description            : No Site Level Policy Set for new document libraries
To set a version history limit on site level we can type the following:
ss
Check the settings on SharePoint list level
If the version policy is not set on the site or list, the setting of the tenants will be used.
Get-PnPList "Freigegebene Dokumente" | ft EnableAutoExpirationVersionTrim, ExpireVersionsAfterDays, MajorVersionLimit

EnableAutoExpirationVersionTrim ExpireVersionsAfterDays MajorVersionLimit
------------------------------- ----------------------- -----------------
                                                                        0
Let’s now set the version history limits …
To set the new limits on SharePoint tenant level, you first have to determine for yourself, what option suits you and your tenant / customers the best. My advice would be to use the automatically setting on tenant level and alter the setting on site level.
With that approach you can maximize the usefulness of versions for sites with a lot of small files and changes like documents and reduce the limit on sites with content like media or big data, that doesn’t absolutely need a lot of versions versions or access to old versions.
The minimum number of major versions is 100, the default is 500 and the maximum is 50.000. This can be combined with the age of at least 29 days or a maximum of 100 years.
Yeah … good luck Microsoft with that.
… at tenant level
To activate the new setting we can do it via the SharePoint Online Admin Center or with a single PowerShell command:
Set-PnPTenant `
-EnableAutoExpirationVersionTrim $false `
-ExpireVersionsAfterDays 30 `
-MajorVersionLimit 150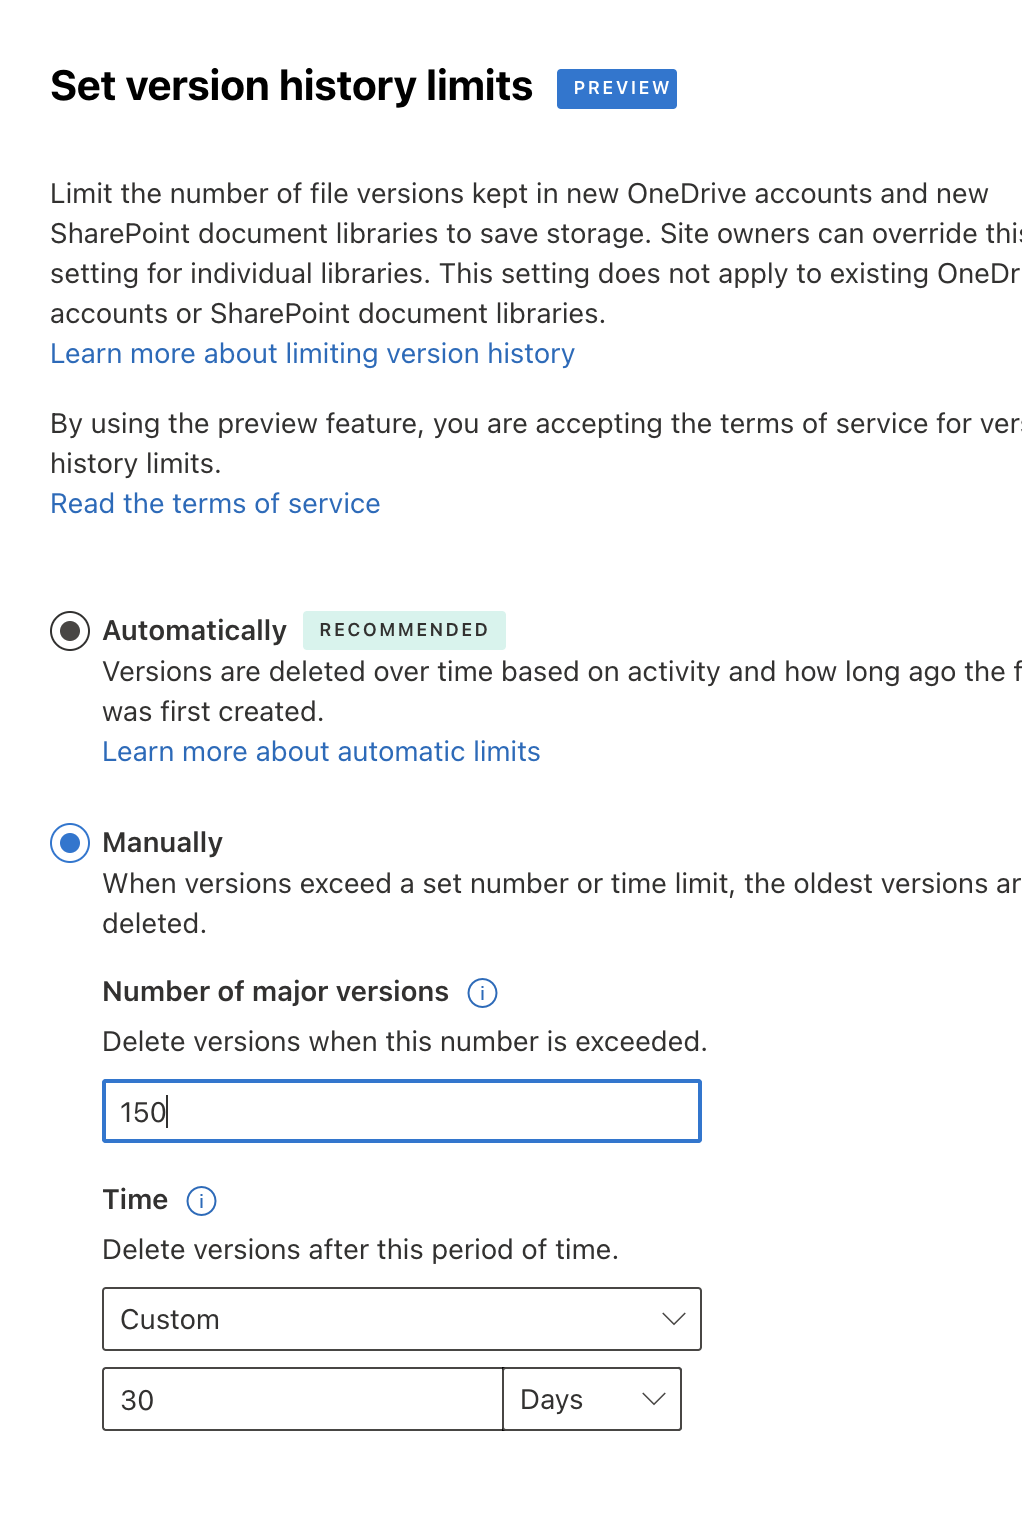
Check the settings you just applied at tenant level
After that we can control if our settings on tenant level have been successfully applied via the following command:
Get-PnPTenant | fl EnableAutoExpirationVersionTrim, ExpireVersionsAfterDays, MajorVersionLimit

EnableAutoExpirationVersionTrim : False
ExpireVersionsAfterDays         : 30
MajorVersionLimit               : 150
Set it at SharePoint site level
If you don’t want to set these settings at tenant level or want to override the settings for a specific SharePoint site, wen can do this too and even decide if it should only affect new or even existing document libraries too. Its important to connect to the right site before you execute the command.
Apply to existing document libraries
Set-PnPSiteVersionPolicy -EnableAutoExpirationVersionTrim $false `
-MajorVersions 150 -MajorWithMinorVersions 150 -ExpireVersionsAfterDays 30 `
-ApplyToExistingDocumentLibraries
Apply to new document libraries
Set-PnPSiteVersionPolicy -EnableAutoExpirationVersionTrim $false `
-MajorVersions 150 -MajorWithMinorVersions 150 -ExpireVersionsAfterDays 30 `
-ApplyToNewDocumentLibraries
After the command it will take some time until the policy is processed. You can view the status of the policy too. It will change from New to CompleteSuccess if no error occurs.
Url                         : https://timoewiak.sharepoint.com/sites/TimosVersionHistory
WorkItemId                  : 8c8e55bc-654f-456f-9014-14594cb0d15c
Status                      : CompleteSuccess
RequestTimeInUTC            : 07/08/2024 18:25:03
LastProcessTimeInUTC        : 07/08/2024 18:31:01
CompleteTimeInUTC           : 07/08/2024 18:31:01
LibrariesProcessedInTotal   : 5
LibrariesFailedInTotal      : 0
EnableAutomaticMode         : False
ExpireAfterDays             : 30
MajorVersionLimit           : 150
MajorWithMinorVersionsLimit : 150
Set it only on a single SharePoint List
We can even go one level deeper and decide to apply the version history limit only at a specific SharePoint document library or configure a different setting than on tenant or site level. By default the setting for minor versions is disabled, but you can enable it with the switch EnableMinorVersions.
Set-PnPList -Identity "Freigegebene Dokumente" -EnableAutoExpirationVersionTrim $false `
-ExpireVersionsAfterDays 40 -MajorVersions 250

Title     Id                                   Url
-----     --                                   ---
Documents c8de33e4-22f4-4a35-8c45-5df624091471 /sites/TimosVersionHistory/Freigegebene Dokumente
After that we can simply check the setting with Get-PnPList, but I did not yet figured out how to see the other settings for a library.
Get-PnPList "Freigegebene Dokumente" | select MajorVersionLimit

MajorVersionLimit
-----------------
              250
Creating Reports, ‘What-If’ analysis’s and one-time-trim-jobs
Before, while and after altering the settings it’s important to know what you are doing. In most cases the content of these SharePoint Sites isn’t yours but from another devision or team. So before you limit or delete anything within a tenant, site or library, you should create a report what impact a change would have.
Fortunately Microsoft thought so too and gave us the possibility to create usage reports for sites and libaries. They even wrote a great page how to understand these reports. To create a report you simply have to use one of the following commands with a path to save it to.
# For a site report
New-PnPSiteFileVersionExpirationReportJob -ReportUrl "https://timoewiak.sharepoint.com/sites/TimosVersionHistory/Reports/SiteVersionReport.csv"

# For a library report
New-PnPLibraryFileVersionExpirationReportJob -Identity "Freigegebene Dokumente" -ReportUrl "https://timoewiak.sharepoint.com/sites/TimosVersionHistory/Reports/ListVersionReport.csv"
Such a report can take some time to be generated, especially on bigger sites or libraries. Longer than 24 hours even. To get the status of a report job you can gather that information with Get-PnPSiteFileVersionExpirationReportJob or Get-PnPLibraryFileVersionExpirationReportJob. If you want to remove the entry in the job queue just use the “remove”-command equivalents.
If a report looks promising and you want to get things serious you can also create one time delete jobs for single sites or libraries. You just have to start the clean up with the following commands but be cautious, because there is no undo. This is not necessary if you set the version history limit policy.
# For a site clean up job
New-PnPSiteFileVersionBatchDeleteJob -DeleteBeforeDays 30
Success. Versions specified will be permanently deleted in the upcoming days.

# For a library clean up job
New-PnPSiteFileVersionBatchDeleteJob -DeleteBeforeDays 30
Success. Versions specified will be permanently deleted in the upcoming days.
You can always check the progress with the “get”-command equivalents like Get-PnPSiteFileVersionBatchDeleteJobStatus and later of course remove the entry in the job due with Remove-PnPSiteFileVersionBatchDeleteJob. I tried to stop a deletion that was in progress, which worked but did not recover the already removed files of course.
It’s highly recommended to study the excellent Microsoft Learn Article regarding that new feature and I hope I was able to bring you a little closer to it.